Nail Art is all about experimenting with your creative imagination on your nails, instead of paper in case of normal art. Now when it comes to beginners, things would not be easy as is discovering new art related techniques on paper. So, for them, we have easy hacks in the form of step by step tutorials, following which they can acquire amazingly fancy nail art designs and can slowly pave their way to maybe becoming a professional at it.

Now before we start the tutorials, we need to keep in mind a few steps that we need to follow before actually starting with nail art designing. The first step being cleansing of the nails, through the use of a nail cleanser or a solution of warm water mixed with lime water. The second step and the last one before starting the actual designing process is the application of base coat on your nails. Application of base coat enables smooth application of nail colour and helps hold the nail colour for a longer time. Here goes the list of 5 amazingly easy nail art designs in terms of step by step tutorials: –
1. The Metallic French Manicure

French Manicure doesn’t necessarily need to be done in the shades of white when you can do it in matte and metallic black. After you have applied the base coat, just apply a coat of matte-black nail colour on the whole of all your nails. After it dries, take transparent paper-tape strips (as it doesn’t leave a messy texture on your nails after you remove it) and cover the bottom matte-colored part of the nails as visible in this picture with them. Then you have the rest of nail, that is the uncovered part to colour it with metallic nail paint. So, just apply metallic nail colour on the uncovered part of nails, and then allow the nail colour to dry. Once it has dried up, just remove all the tape-strips, one by one and slowly.
2. The Party Rockers

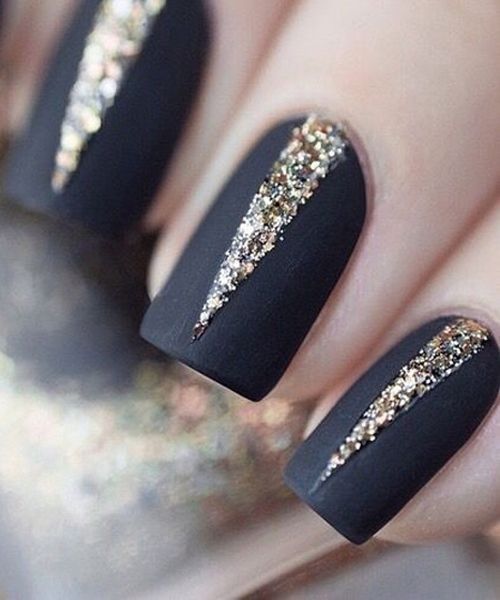
To rock the party with these party rocker nails you just need three things, a matte-black nail paint, a golden shimmer nail paint, and transparent paper tape. Just apply a coat of matte-black nail paint on your nails. After it dries, take the paper-tape strips and stick it on your nails to make a triangle like a shape (which will remain uncovered from the tape) as of the golden nail-color design in the picture above. Then apply a coat of golden shimmer nail colour on your nails and let it dry. After some time, slowly peel off the tape strips, one by one. And you’re good to go.
3. Tape it All

For, this one we’ll use tape as the design instead of using it for designing. Such designer tapes are easily available in stationery shops as DIY accessories. You can shape these tape strips into the design of your nails either before sticking them on to your nails with the help of scissors or after that with the help of a nail filer. After this process, help these last long on your nails with the help of a top coat, and you’re good to go.
4. Plainly White

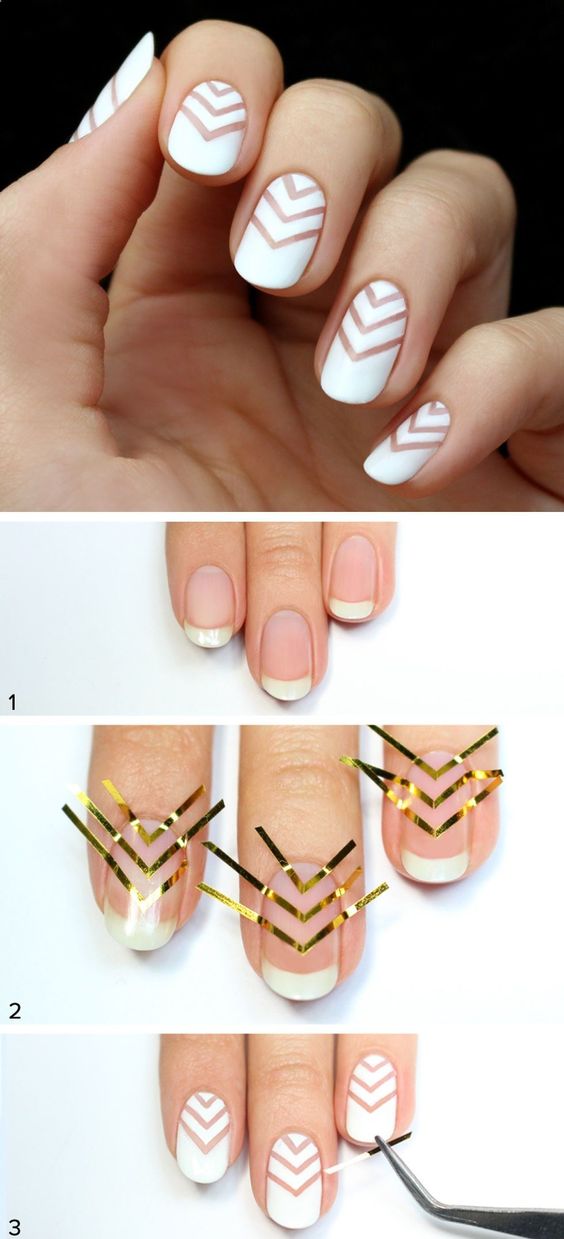
As visible in the picture, this is an easy 3 step nail art design. All you need to do is apply base coat followed by sticking thin tape strips as designed in the picture in the shape of upside-down triangles. After that apply a coat of white nail colour on all your nails and let it dry. Then slowly remove all these strips one by one, and you have beautifully designed nails as a result.
5. It’s Contrasting

For the last one, take a pair of contrasting nail paints, applying one as a base and keeping the other for the design. After the application of the first nail colour, cut paper tape strips into various shapes as depicted in the picture above or in other shapes as you want. Then, stick them onto your nails as depicted and apply a coat of the second nail colour and let it dry. After this, peel off the tape strips one after the other to see the magical results.
These were a few nail art designs, that can be easily designed by beginners. Who knows, by practicing more and more and by taking these designs as your first few stepping stones, you may soon become a pro at nail art designing.


